A Python Hello World on ArmoniK on the GPU [PymoniK]
Description
This project contains a worker and a client to interact with ArmoniK’s Control Plane. The worker processes tasks sent by the Agent, transforming input data and sending results back to it. The input data consists of two vectors with a size specified by the user. The worker performs the sum on the GPU to accelerate the computation.
This guide will help you set up your environment to perform GPU-accelerated calculations within a pod running on WSL Ubuntu. We will use Docker to manage the pod and NVIDIA Docker for GPU support.
Windows-Only Prerequisites
Windows 10 or 11 with WSL2 enabled.
Ubuntu installed via WSL.
NVIDIA GPU with the latest drivers compatible with WSL.
Docker with WSL2 backend or preferably installed directly in WSL (this guide will cover steps with the second option).
NVIDIA Docker Toolkit.
k3s installed and configured.
kubectl command-line tool.
NVIDIA Kubernetes device plugin.
Prerequisites
NVIDIA GPU with the latest drivers.
Docker.
NVIDIA Docker Toolkit.
k3s installed and configured.
kubectl command-line tool.
NVIDIA Kubernetes device plugin.
Step-By-Step Guide and Explanation
1. Set up WSL2 and Ubuntu
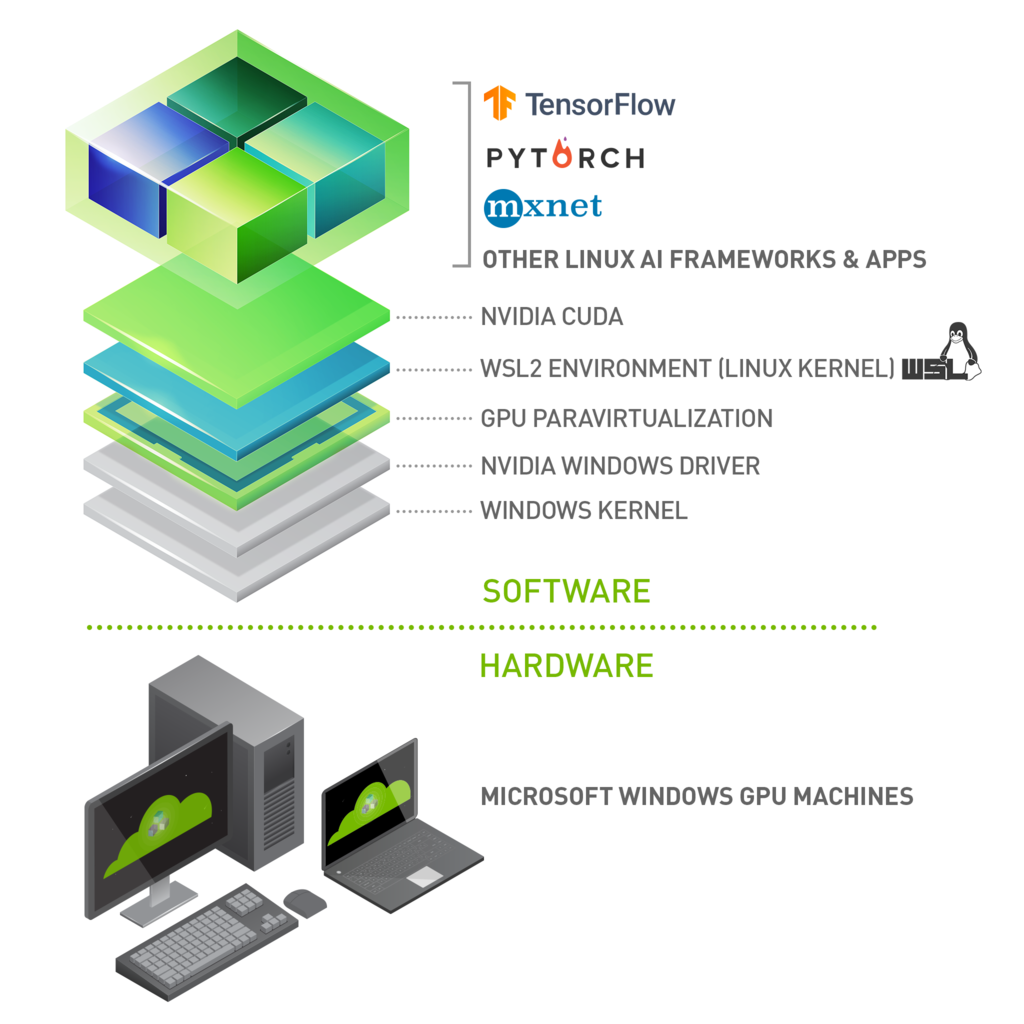
WSL 2 is a key enabler in making GPU acceleration to be seamlessly shared between Windows and Linux applications on the same system a reality. This offers flexibility and versatility while also serving to open up GPU accelerated computing by making it more accessible.
Follow steps in this guide to get wsl on your machine running with Ubuntu.
2. Install docker, k3s, and kubectl
Deploy ArmoniK locally by following the instructions at ArmoniK Documentation. This will ensure docker, k3s and kubectl are installed and set up correctly for ArmoniK environment.
3. Install NVIDIA Driver for GPU Support
Install NVIDIA GeForce Game Ready or NVIDIA RTX Quadro Windows 11 display driver on your system with a compatible GeForce or NVIDIA RTX/Quadro card here.
Note: This is the only driver you need to install. Do not install any Linux display driver in WSL.
4. CUDA Support for WSL 2
The latest NVIDIA Windows GPU Driver will fully support WSL 2. With CUDA support in the driver, existing applications (compiled elsewhere on a Linux system for the same target GPU) can run unmodified within the WSL environment.
To compile new CUDA applications, a CUDA Toolkit for Linux x86 is needed.
Once a Windows NVIDIA GPU driver is installed on the system, CUDA becomes available within WSL 2. The CUDA driver installed on Windows host will be stubbed inside the WSL 2 as libcuda.so, therefore users must not install any NVIDIA GPU Linux driver within WSL 2. One has to be very careful here as the default CUDA Toolkit comes packaged with a driver, and it is easy to overwrite the WSL 2 NVIDIA driver with the default installation. We recommend developers to use a separate CUDA Toolkit for WSL 2 (Ubuntu) available from the CUDA Toolkit Downloads page to avoid this overwriting. This WSL-Ubuntu CUDA toolkit installer will not overwrite the NVIDIA driver that was already mapped into the WSL 2 environment.
First, remove the old GPG key:
sudo apt-key del 7fa2af80
Installation of Linux x86 CUDA Toolkit using WSL-Ubuntu Package:
The CUDA WSL-Ubuntu local installer does not contain the NVIDIA Linux GPU driver, so by following the steps on the CUDA download page for WSL-Ubuntu, you will be able to get just the CUDA toolkit installed on WSL.
Installation Instructions:
wget https://developer.download.nvidia.com/compute/cuda/repos/wsl-ubuntu/x86_64/cuda-wsl-ubuntu.pin
sudo mv cuda-wsl-ubuntu.pin /etc/apt/preferences.d/cuda-repository-pin-600
wget https://developer.download.nvidia.com/compute/cuda/12.5.1/local_installers/cuda-repo-wsl-ubuntu-12-5-local_12.5.1-1_amd64.deb
sudo dpkg -i cuda-repo-wsl-ubuntu-12-5-local_12.5.1-1_amd64.deb
sudo cp /var/cuda-repo-wsl-ubuntu-12-5-local/cuda-*-keyring.gpg /usr/share/keyrings/
sudo apt-get update
sudo apt-get -y install cuda-toolkit-12-5
NVIDIA CUDA software stack on WSL 2
To verify the correctness of the steps above type the following command in your terminal:
nvidia-smi
Your output should resemble the following output:
+-----------------------------------------------------------------------------+
| NVIDIA-SMI 535.86.10    Driver Version: 535.86.10    CUDA Version: 12.2     |
|-------------------------------+----------------------+----------------------+
| GPU  Name        Persistence-M| Bus-Id        Disp.A | Volatile Uncorr. ECC |
| Fan  Temp  Perf  Pwr:Usage/Cap|         Memory-Usage | GPU-Util  Compute M. |
|                               |                      |               MIG M. |
|===============================+======================+======================|
|   0  Tesla T4            On   | 00000000:00:1E.0 Off |                    0 |
| N/A   34C    P8     9W /  70W |      0MiB / 15109MiB |      0%      Default |
|                               |                      |                  N/A |
+-------------------------------+----------------------+----------------------+

+-----------------------------------------------------------------------------+
| Processes:                                                                  |
|  GPU   GI   CI        PID   Type   Process name                  GPU Memory |
|        ID   ID                                                   Usage      |
|=============================================================================|
|  No running processes found                                                 |
+-----------------------------------------------------------------------------+
5. Installing the Docker Utility Engine for NVDIA GPUs
The NVIDIA Container Toolkit allows users to build and run GPU accelerated Docker containers. The toolkit includes a container runtime library and utilities to configure containers to leverage NVIDIA GPUs automatically.

Installing with Apt:
Configure the production repository:
curl -fsSL https://nvidia.github.io/libnvidia-container/gpgkey | sudo gpg --dearmor -o /usr/share/keyrings/nvidia-container-toolkit-keyring.gpg \
  && curl -s -L https://nvidia.github.io/libnvidia-container/stable/deb/nvidia-container-toolkit.list | \
    sed 's#deb https://#deb [signed-by=/usr/share/keyrings/nvidia-container-toolkit-keyring.gpg] https://#g' | \
    sudo tee /etc/apt/sources.list.d/nvidia-container-toolkit.list
Update the packages list from the repository:
sudo apt-get update
Install the NVIDIA Container Toolkit packages:
sudo apt-get install -y nvidia-container-toolkit
Configure the container runtime by using the nvidia-ctk command:
sudo nvidia-ctk runtime configure --runtime=docker
The nvidia-ctk command modifies the /etc/docker/daemon.json file on the host. The file is updated so that Docker can use the NVIDIA Container Runtime.
Restart the Docker daemon:
sudo systemctl restart docker
Configuring containerd (for Kubernetes):
Configure the container runtime by using the nvidia-ctk command:
sudo nvidia-ctk runtime configure --runtime=containerd
The nvidia-ctk command modifies the /etc/containerd/config.toml file on the host. The file is updated so that containerd can use the NVIDIA Container Runtime.
Restart containerd:
sudo systemctl restart containerd
Running a Sample Workload with Docker:
sudo docker run --rm --runtime=nvidia --gpus all ubuntu nvidia-smi
Your output should resemble the following output:
+-----------------------------------------------------------------------------+
| NVIDIA-SMI 535.86.10    Driver Version: 535.86.10    CUDA Version: 12.2     |
|-------------------------------+----------------------+----------------------+
| GPU  Name        Persistence-M| Bus-Id        Disp.A | Volatile Uncorr. ECC |
| Fan  Temp  Perf  Pwr:Usage/Cap|         Memory-Usage | GPU-Util  Compute M. |
|                               |                      |               MIG M. |
|===============================+======================+======================|
|   0  Tesla T4            On   | 00000000:00:1E.0 Off |                    0 |
| N/A   34C    P8     9W /  70W |      0MiB / 15109MiB |      0%      Default |
|                               |                      |                  N/A |
+-------------------------------+----------------------+----------------------+

+-----------------------------------------------------------------------------+
| Processes:                                                                  |
|  GPU   GI   CI        PID   Type   Process name                  GPU Memory |
|        ID   ID                                                   Usage      |
|=============================================================================|
|  No running processes found                                                 |
+-----------------------------------------------------------------------------+
If you run into the following issue:
> docker run --rm --gpus all ubuntu nvidia-smi
Failed to initialize NVML: GPU access blocked by the operating system Failed to properly shut down NVML: GPU access blocked by the operating system
Inside the file /etc/nvidia-container-runtime/config.toml change no-cgroups from true to false.
Configure the nvidia-container-runtime as the default low-level runtime to use:
Edit Docker Daemon Configuration:
Open the Docker daemon configuration file using a text editor. This file is typically located at /etc/docker/daemon.json.
sudo nano /etc/docker/daemon.json
Configure the Default Runtime:
Add or update the default-runtime key to specify nvidia as the default runtime. Ensure the file includes a section for runtimes and sets nvidia-container-runtime as the path for the nvidia runtime. Your daemon.json should look something like this:
{
  "runtimes": {
    "nvidia": {
      "path": "nvidia-container-runtime",
      "runtimeArgs": []
    }
  },
  "default-runtime": "nvidia"
}
Restart Docker Daemon:
After saving the changes, restart the Docker daemon to apply the new configuration.
sudo systemctl restart docker
6. NVIDIA device plugin for Kubernetes
The NVIDIA device plugin for Kubernetes is a Daemonset that allows you to automatically:
Expose the number of GPUs on each nodes of your cluster.
Keep track of the health of your GPUs.
Run GPU enabled containers in your Kubernetes cluster.
You can enable GPU support by deploying the following Daemonset:
$ kubectl create -f https://raw.githubusercontent.com/NVIDIA/k8s-device-plugin/v0.16.1/deployments/static/nvidia-device-plugin.yml
Setting up the worker and running the workload
Build the Docker image for the worker:
docker build -t pymonik-gpu-worker .
Deploy ArmoniK locally by following the instructions at ArmoniK Documentation. Ensure you create a new partition named “gpumonik” with the worker’s image. Following this example:
gpumonik = {
    # number of replicas for each deployment of compute plane
    replicas = 0
    # ArmoniK polling agent
    polling_agent = {
    limits = {
        cpu    = "2000m"
        memory = "2048Mi"
    }
    requests = {
        cpu    = "50m"
        memory = "50Mi"
    }
    }
    # ArmoniK workers
    worker = [
    {
        image = "pymonik-gpu-worker"
        tag   = "runtime"
        limits = {
        cpu    = "1000m"
        memory = "1024Mi"
        }
        requests = {
        cpu    = "50m"
        memory = "50Mi"
        }
    }
    ]
    hpa = {
    type              = "prometheus"
    polling_interval  = 15
    cooldown_period   = 300
    min_replica_count = 0
    max_replica_count = 5
    behavior = {
        restore_to_original_replica_count = true
        stabilization_window_seconds      = 300
        type                              = "Percent"
        value                             = 100
        period_seconds                    = 15
    }
    triggers = [
        {
        type      = "prometheus"
        threshold = 2
        },
    ]
    }
},
Create an environment and add necessary packages:
uv init
uv add pymonik "jax[cuda12]"
Usage
Run the Client to check if your GPU is detected:
uv run checkgpu.py
If one or multiple Cuda devices appear in the output, it means that you can use your GPU to compute JAX code !
You can try to run the gpu_cpu.py file to run two sessions, the first one is on GPU and the second is on CPU.